Monday, 10 March 2008

Conclusion

I am extremely pleased with the way my project has turned out. Although there were things I could have planned a little better, and I could have used my time a bit wiser, perhaps by moving the shoot date forward, to give me more time for post production, or if needed a re-shoot. 

I think that the concept of my shoot although slightly bazaar, has worked well and developed into a set of strong finals. I especially like the contrast between the intense white of the skin and back ground against the colours of the features. The shadow images, was a bit of a hot and miss idea, but I followed the concept and personally think the images work well along side the normal images.

I think that given the project again I would have perhaps experimented with lavish make up, but I think for the concept I had, using makeup would have just been too much for the frames.

I believe I have worked extremely hard to complete both the research and finals within the deadline. The research I have produced I believe has been developed well and concluded with a good set of imagery. 

I am happy with the images I have created and think I have greatly developed my photoshop skills throughout this project. I have let my project become experimental and so this has been a technical development within my own work as a photographer. 

This project although quite stressful, has been  enjoyable and challenging to carry out. I like the pressure of having a deadline and creating a proposal even if the proposal changes or varies slightly. 

The final Images.

These are my final images.

Creating the shadow images

In order to create the shadow finals I just inverted my three fully edited images. Then by simply creating a new duplicate layer, I altered the position of the second layer to create a shadow on the original images. 

It is from this idea that the narrative of my project came about, and that is of a woman not only looking at herself for the beauty, but for the negatives. The images run in sequence of looking at the positive beauty then the negative, almost like a personal comparison is emerging. I based this on how women look at them selves..never happy with what they themselves have. There is always something about yourself that you see as a negative. Although the narrative is relatively obscure I think it works well with this idea of the robotic, because it brings the question of falsity and even the idea of plastic surgery and trying to falsify yourself for beauty. There is something cold and detatched about the images and I think that works well within the context. The clean lines and crispness of each image helps enhance this as there is such a harshness to the overall look.

Enlarging The Eyes

In looking at the final images I decided to enlarge the eyes. This is because the detail of the image, is within the eyes and I wanted to enhance this feature, given the fact that my image was so white intense, I also think it will bring the viewers gaze to the contrast between the whiteness of the image and tonal range of the eyes. Also by enlarging the eyes I help to portray this idea of the robot and man made beauty. Here are some experiments I did in relation to using the free transform tool.

Too Big - Bug Eyes!
Too Small
The Right Size!


Post Production

Taking my inspiration from both the work of Chris Cunningham and Vicky Steckel, I am going to be using photoshop to create a pure white intense image besed around the idea of healing and robotics. It does sound like an odd combination, but with the image I have formulated within my own mind, I think that this is most probably the easiest way to explain it. As well as that I plan to play with the colours of arden, not only the reds, blacks and whites, but the terra-cotta/ peach colour of the actual cream.

I am going to use just 1 of my 3 images to show how I constructed my 3 final images as the same process was applied to all, in exactly the same ratios and amounts.

The first thing I need to do is resize the images to A3 so that any cropping can be done at the beginning of post production. The height of an A3 image is 42cm and the width of an A3 image is 29.7cm. 


This then changes the image size to 49.8M. Where it had previously been around 22.9M with a RAW file and 8 Mega Pixel Camera.

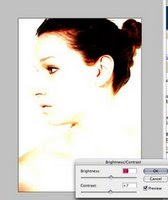
The next step was to add a duplicate layer in which to control and adjust the contrast and brightness of the image. The reason for doing this is to change the intensity of the white and create the pure look I was trying to achieve. 


You must vary the opacity in order to create the desired level of contrast between the original image and the new layer. I chose to keep it at 100% because I needed the intensity to be high

Next on the same duplicate layer I changed the curvature of the shadows and highlights in order to create vibrant features that stood out against the white skin and back ground.

The next thing I did was to flatten the image, so that the duplicate layer and original now became one layer. This meant that I could now start cloning out unwanted shadows and the hair line.

3 Selected Finals

After looking at the contact sheets, I have decided I like these three images the most and think that they work well as a series. I like the different angles of the face and how the features engage with the camera. The reason I have only selected three images is because when I create the shadow images, I will still be using these three images to create the idea of a shadow image. This will consequently give me six final images. As a sequence they look as though the model is turning her head to face the camera. I quite like this overall feel of realising she is the voyeuristic subject.


Friday, 7 March 2008

Final Shoot

The final shoot was scheduled for February the 29th, and thank fully everything went according to plan. Here was the plan of the shoot.


09:30 - Meet Stephanie and Ki at London Bridge tube station.
09:40 - Amy starts setting up the lighting whilst me and Stephanie walk to make shift studio.
09:50 - Arrive at Amy's and help with lighting, test flashes. Ki starts make up.
10:25 - Ki finishes make up.
10:30 - Start photo-shoot.
13:00 - Lunch Break
15:00 - Photo-shoot ends.

The whole shoot went according to plan and everything went well. I am also pleased with the final images and believe they will work well within the concept of post production. I still feel extremely enthusiastic about this project and will start post production within the next day. 

Here are the various components within the shoot:

Aperture Value: 5.6
Shutter Speed: 1/50sec
Flash Heads: 5.6 - 1/50sec
Lens: 20-50mm
Camera: Canon 350D SLR
Files: RAW

Here are the contact sheets from the shoot:


Ki Lee - Make up Artist

I decided having a make up artist and stylist was going to be a vital component within this shoot and so put up a notice within my university halls, for a make up artist and stylist. I asked for a portfolio of images to be shown so I could decide who's ability was best, for the shoot I intended to do. 

The person I chose was Ki Lee, a student at LCF, currently studying a foundation degree in Make up and Styling. Her portfolio was amazing , she had a variety of images ranging from vibrant and experimental - subdued and natural. So far within her course she has achieved grades around the 87-90 percentile. She is the perfect candidate for my shoot. As she is also studying styling, I have decided it will be easier to include her as the stylist as well. This will limit numbers on the day of the shoot.

Here are some of the images from her portfolio:


Test Shoot

These are the test images I have taken further from the lighting tests and model testing. In reflection I don't think she should wear her hair down, but have it up, as this will leave her facial features completely exposed, and also it will make it easier to remove the hair line in the final stages of post production. I used my make up artist Ki Lee to just create a flawless texture to Stephanie's skin and also apply very little eye make up, just so the features do not get lost within post production.

The aperture value for the shoot was at a steady 5.6
The shutter speed was at a constant of 1/50sec
The ISO was set at 200
All files were taken as RAW
Lens used was 20-55mm
The flash heads were both set at 5.6

Here are the test images taken.


Model

I have decided that after using Stephanie to test the lighting on, she is a perfect model for my project because her facial features can quite easily be manipulated to resemble that of a robotic nature. The test has a blue tint within it because I used a filter to make the image seem colder in colour. Here is a test I did with her quickly whist testing out the lighting set up.


STATISTICS:
Name: Stephanie Zingg
Age: 22
Hair Colour: Dark Blonde
Eye Colour: Blue/Grey
Shoe Size: 7 1/2
Waist: 24 in
Hips: 26 in
Height: 176cm
Ethnicity: White/Caucasian
Hometown: Austria

Creation of Studio

I created my own studio within a friends apartment. The reason for this was because all the university facilities were fully booked and also the apartment has bright white walls, perfect for my shoot. The person's apartment I am taking advantage of is situated close to where I am currently living and so will be easy to travel to. As a freelance photographer herself she has a full set of lighting equipment I can use and so it will be easy to set up the make shift studio. 

I decided to test out the equipment with a friend I intend to use as my model. Below is the lighting set up I will be using within my shoot, thankfully my photographer friend has agreed to also be my lighting assistant and so this will also make the set up of the studio much easier. With her input as well as my own, we have decided this will create the best effect within the shoot and create that natural skin texture I want. 

Lighting

In order to create this new concept I think I am going to have to look at lighting and what it is I will want to achieve within this component of the photographic image. I have put together some examples of various lighting in which the white intensity is dominant within the composition. By doing this I will get a better idea of what is needed to create my desired effect. 

Here are some examples I have found that I think could work within my own shoot, I will look at each example and choose between them to see which will work best, and which I can use myself. These images are also quite similar to the idea I have in the back of my mind. The models within these images appear almost unreal or robotic..


Proposal and Final Concept

I have decided upon a new concept for my proposal and it incorporates this idea of pure skin within the context of my influential photographers and the music video by Chris Cunningham. I intend to produce a set of images that show the skin as an intense white that merges directly into the background of the studio light to enhance this deep sense of purity and youthful skin. Either that or take inspiration from the Postal Servcice's music video and create a dynamic contrast between black and white but transforming the backdrop to black. The image I have in mind will look slightly surreal as there will be no tonal input, apart from around the features like the eyes, lips and nose. Everything thing within the frame will be an intense white (and or black).  I like the idea of creating a shadow image, and so I will be doing this within photoshop.

This whiteness will signify not only purity but the new age feel my client is looking for. I think that in order to incorporate this idea of robotics, I will have to accentuate the eyes, perhaps use the transform tool within photoshop to enlarge them. This again is reminiscent of what Chris Cunningham had done within his own videos. However although I will be using Cunningham as a source of inspiration, I will not be transforming the features so much as to make the model look inhuman. 

I am going to be doing the shoot within a studio. I will most probably be using two flash heads, and a light directed towards the white back drop to intensify the white. I do not want any deep shadows cast on the model so the light of the flash head will be directed on both sides of the model, to insure there are no dark shadows. This will make it easier within post production to merge the backdrop into the whiteness of the skin or create a more defined edge. 

The model I use will have to have fair skin which can be made to look absolutely flawless in appearance. This will also help to enhance the concept of the robotic notion. Hair color is not important as I will probably remove the hair within photoshop. 

The make up and styling of the shoot will be natural as the idea of a robot to me clarifies that the model should be clean of make up. I think the main use of make up will be in creating a flawless finish to the skin. There are no accentuated features apart from that of the skins texture and so the styling will be fairly basic and easy to achieve.

Photoshop will be a vital component within my shoot, and so I will be taking this project on a digital camera - Canon 350D SLR, and most probably a 55 - 90mm lens. The reason for this will be because like most beauty shoots I will be taking head shots. I will not be including any full length or mid length shots because I really do want to create a strict beauty shoot based around the facial skin. 

Also within the stages of photoshop I will be inverting the images, to create the shadow images.

Hopefully with all of these elements thought about I will have no problems within the shoot, whereas the last idea fell apart at the seems because of my location being the main element.

Postal Service

The postal service music video has the same futuristic feel as the Chris Cunningham video. The use of white again is very dominant, but also the use of metal and metallic objects. I dont think that this idea of metallic can come into my shoot, unless I was to use make up that made the skin resemble that of a metal? This would be very hard to achieve. I will have to think about that idea a little further.

In the mean time I have now come up with a proposition for the final images. I am still waiting to receive the tiff images of the designs Peter wants me to use, hopefully he will have them ready for me soon, so I have an idea of what I am going to be incorporating. I also particularly love the contrast between the black and white, seen clearly within the images below.


Here are some stills from the music video:

Chris Cunningham

In relation to the last post, I have found the music video Chris Cunningham created for Bjork's song "All is full of love" in which she appears as a new age robotic form. The video is extremely sensual and empowering to watch and it it this quality I love. I also must note that the intensity of white within each frame of the video is so vibrant, that like the three images I referred to in my last post, it seems to purify and seep into the forms of the image. I think this is now something I am going to have to incorporate into my final image as it has enthused me and my client so much. For me this is creating an exciting new take on the idea of purity, the incorrupt purity of the image. Something beautiful even though relatively different from the norm. I could go so far as to say something artistic, but this might be seen as a slight over exaggeration. The video can be viewed from the link to the top right of the screen, under the heading Chris Cunningham, or you can click on this link to direct you straight to the website.


Here are some stills from the video that accentuate this feeling of light intensity and purity. I also love the sterile feel of the video created from the vibrant whites.